Transfer molding is a manufacturing process where pre-heated polymer material is forced into a closed mold cavity.
In this process, you first place a pre-weighed amount of material into a chamber known as a transfer pot. The material is then heated until it reaches a flowable state.
When ready, pressure forces the material through channels, which also called runners, into the mold cavity.This method allows for precise control over how the material fills the mold.
History and Evolution of Transfer Molding
Transfer molding emerged as manufacturers needed more precise methods for creating complex plastic parts. It evolved from compression molding, adding the transfer pot and runners to improve material flow and part consistency.
The technique gained popularity in the mid-20th century as electronics and consumer goods demanded more intricate plastic components. Early applications focused on electrical parts where precise dimensions were critical.
Over time, equipment became more automated, with computer controls replacing manual operations. Modern transfer molding machines offer precise temperature regulation, pressure control, and cycle timing.
Today’s systems can produce parts with tight tolerances and complex geometries that weren’t possible with earlier methods.
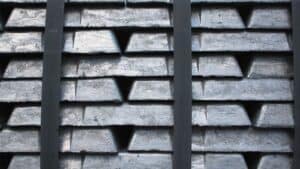
Materials Used in Transfer Molding
![]()
Thermoset Polymers
These materials start as liquid or semi-solid resins that permanently harden when heated. Unlike thermoplastics, thermosets cannot be melted again after curing.
Popular thermoset options include:
- Epoxy resins: Excellent for electronic components due to their insulating properties
- Polyurethane: Offers good flexibility and chemical resistance
- Phenolic compounds: Provide high heat resistance and dimensional stability
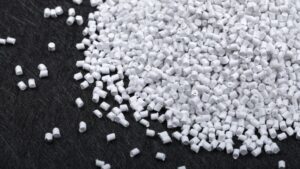
Thermoplastic Resins
While less common in transfer molding, thermoplastic resins can be used when specific properties are needed. Unlike thermosets, thermoplastics can be remelted and reused.
Two popular thermoplastics that work well in transfer molding are:
- Polypropylene: Offers good flow characteristics and chemical resistance
- Polycarbonate: Provides excellent impact strength and optical clarity
Composite Materials
Composite materials combine polymer resins with reinforcing fibers or fillers to enhance performance. These materials offer superior strength-to-weight ratios compared to standard polymers.
Common reinforcements include:
Glass fibers: Improve structural rigidity and dimensional stability Carbon fibers: Provide exceptional strength with minimal weight Mineral fillers: Enhance heat resistance and reduce costs
When you need specialized properties like electrical conductivity or flame resistance, additives can be incorporated into the base resin. For example, adding carbon black creates electrically conductive parts.
Composites are particularly valuable in aerospace and automotive applications where weight savings and strength are critical. They can be formulated to meet specific requirements for thermal expansion, flame retardancy, or UV stability.
Process of Transfer Molding
Preparation of Materials
First, you need to select the right molding compound for your project.
You’ll need to measure the exact amount of material needed for your part. This is called the “charge” or “charge weight.” Too little material means incomplete parts, while too much causes excess flash and waste.
Molding Equipment
Your transfer molding setup will include several key components. The main parts are the transfer pot (where material is first placed), the plunger, and the mold cavity.
The transfer pot sits at the top of the assembly. It’s where you’ll place your pre-measured material charge before it gets pushed into the mold.
Runners and gates connect the transfer pot to the mold cavity. They create pathways for the material to flow through. Their design affects how well the material fills the mold.
Once you’ve loaded the material into the transfer pot, heating begins. The material needs to reach a specific temperature—usually between 300-400°F depending on the compound.
As the material heats, it becomes more fluid. The plunger then applies pressure (typically 1,000-10,000 psi) to force the softened material through the runners and into the mold cavity.
The pressure must be consistent to ensure even filling of the mold. Too little pressure can cause voids or incomplete parts.
Heat is maintained throughout this process. Mold temperatures are carefully controlled to ensure proper flow and initial curing.
Curing and Ejection
Curing times vary based on material and part thickness. This might take anywhere from a few seconds to several minutes.
Once curing is complete, the mold opens and ejector pins push out the finished part. At this stage, your part is fully hardened and maintains its shape.
After ejection, you’ll need to remove any excess material (flash) from the part. This happens along the parting line where the mold halves meet.
Applications of Transfer Molding
Electrical Components
Electrical connectors, plugs, and switches, many are made through transfer molding. This technique allows for precise insertion of metal contacts while maintaining electrical insulation properties.
Terminal blocks and junction boxes also benefit from this process. The high-pressure application ensures complete filling of intricate cavities, resulting in reliable parts with consistent dimensions.
Common electrical applications include:
- Semiconductor packaging
- Electrical insulators
- Circuit breaker components
- Connector housings
Automotive Parts
Under-the-hood parts like sensors, ignition modules, and control units require the heat resistance and dimensional stability this process provides.
Transfer molding works well for creating automotive seals and gaskets. These parts need precise dimensions to prevent leaks while withstanding extreme temperatures and chemical exposure.
Interior components like knobs, handles, and buttons are also manufactured this way. The process allows for insert molding, where metal parts are “floated” within the cavity and then surrounded by the molding material.
Key automotive applications:
- Sensor housings
- Engine management components
- Brake system parts
- Electrical distribution components
Medical Devices
Surgical instruments benefit from transfer molding’s ability to produce ergonomic handles with precise dimensions. The process ensures consistent quality needed for medical applications.
Implantable devices and components for diagnostic equipment require the high precision that transfer molding delivers.
Medical applications include:
- Surgical tool handles and components
- Diagnostic equipment parts
- Implant components
- Drug delivery device parts
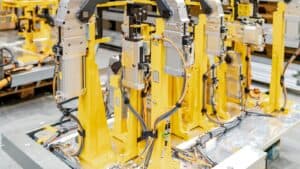
Advantages of Transfer Molding
![]()
Precision and Complexity
Transfer molding excels at creating parts with sharp edges and complex designs. You can achieve much finer detail compared to other molding methods. This makes it perfect for products that need precise specifications.
Transfer molding produces minimal flash (excess material at the part edges). The micro grind vents reduce the need for overflows, resulting in nearly flash-free parts. This means you’ll spend less time and money on secondary finishing operations.
When you need intricate shapes with tight tolerances, transfer molding delivers consistent results. The controlled pressure distribution ensures uniform filling of the mold cavity, even in small, detailed areas.
Material Usage Efficiency
With transfer molding, you’ll waste less material compared to some alternative processes. The measured amount of material used for each cycle helps minimize excess.
The process gives you better control over material flow. This means more predictable results and less scrap production during manufacturing runs.
The ability to create multiple parts in a single cycle with high cavity counts improves material efficiency. You get more finished products from the same amount of raw material.
Challenges and Considerations
Process Control and Optimization
Temperature management is critical. If your temperature is too high, the material might cure too quickly and not fill the mold completely. Too low, and it might not flow properly.
Transfer speed also matters a lot. Moving the material too fast can trap air and create voids in your final product. Moving it too slowly might allow premature curing before the mold fills.
Preheating your materials properly helps avoid these issues
Limitations of Design
Wall thickness must be carefully planned. Too thin, and the material won’t flow properly. Too thick, and you’ll have longer cycle times and potential shrinkage issues.
Insert placement requires special attention. Positioning metal inserts incorrectly can lead to cracking, warping, or weak spots in your finished parts.
Size constraints exist with transfer molding. Very large parts may not be suitable due to equipment limitations and uneven pressure distribution.
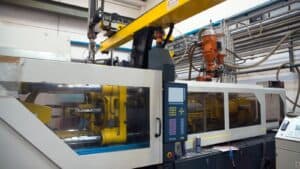
Transfer Molding vs. Compression molding
![]()
Compression molding is simpler but offers less control over material flow. Transfer molding improves on this by pre-heating the material and using controlled pressure to fill the mold cavities more consistently.
Transfer molding excels at:
- Creating parts with inserts
- Producing complex shapes with tight tolerances
- Working with materials that require heat curing
- Minimizing air entrapment in the final product
However, it has limitations too. The process generates more waste material in the runners and transfer pot than compression molding. It also has longer cycle times than injection molding, making it less suitable for high-volume production.
| Aspect | Transfer Molding | Compression Molding |
|---|---|---|
| Process | Material is preheated and forced into a closed mold under pressure. | Material is placed directly into an open mold, which is then closed and heated. |
| Mold Design | Uses a two-part mold with a pot, plunger, and runners. | Uses a simple two-part mold without runners. |
| Material Placement | Material is placed in a separate chamber (pot) before being transferred into the mold cavity. | Material is placed directly into the mold cavity. |
| Pressure Application | High pressure is applied to transfer the material into the mold. | Pressure is applied to compress the material in the mold. |
| Cycle Time | Generally faster due to preheating and efficient material flow. | Slower due to the need for material to heat and cure in the mold. |
| Material Waste | Higher waste due to runners and sprues. | Minimal waste as material is directly placed in the mold. |
| Complexity of Parts | Suitable for more complex and intricate parts with fine details. | Better for simpler, less intricate parts. |
| Production Volume | Ideal for medium to high production volumes. | Suitable for low to medium production volumes. |
| Material Types | Works well with thermosetting plastics, rubber, and some composites. | Primarily used for thermosetting plastics and rubber. |
Frequently Asked Questions
How does the transfer molding process work for rubber products?
In transfer molding for rubber, a pre-weighed rubber compound is placed into a transfer pot or chamber. When heat and pressure are applied, the rubber softens.
The softened material is then forced through channels into the mold cavity. This method ensures even filling of complex mold shapes.
The rubber cures inside the heated mold, creating the final product shape before the mold opens for part removal.
What factors should be considered when choosing a transfer molding machine?
You should consider the part size and complexity when selecting a machine. Larger or more intricate parts require machines with appropriate capacity.
The clamping force needed for your specific material is another important factor. Different polymers require different pressures.
Production volume matters too – higher volumes might justify more automated or higher-capacity equipment.
How does transfer molding differ from compression molding in terms of process and applications?
In transfer molding, material is preheated in a separate chamber before being transferred into the mold cavity. Compression molding places material directly in the open mold.
Transfer molding typically produces parts with better consistency and fewer air traps than compression molding.
You’ll find transfer molding better suited for complex parts with intricate details, while compression molding works well for simpler, larger parts.
